What are Flashcards?
Flashcards are a set of cards with information for a particular topic or subject. The cards are very useful to quickly revise before exams, allowing you to revise the main points in a short space of time, which will help overcome stress and ensure success.
How to make and use flashcards
Flashcards are easy to store and carry around. You and a friend could get together and test each other.
Tip: One storage method is to punch a hole onto each card, allowing you to bind them into a circle
Each card contains information relevant to a particular topic. On one side you have your key question and on the other side you have your answer. You can create a set of flashcards for the key questions in each subject area. You should read three to four cards every night.
It is important to record how often you are reading and testing yourself with each flashcard to make sure you are not missing any. So make sure you number each card, then on a separate master sheet, write down the numbers on one side. Each time you read a flashcard place a tick beside the number of that card. After a few weeks you may notice that there is some cards you have not read in a while so you can focus on those cards.
The steps to making a flashcard
 |
1. Read the material slowly |
| 2. Identify the key words and phrases |  |
 |
3. On one side of the card have the key question and on the other side have your answer |
| 4. Transfer the key words and phrases to the flashcard (write neat and clearly). Use colour |  |
 |
5. Add some memory aids e.g. pictures |
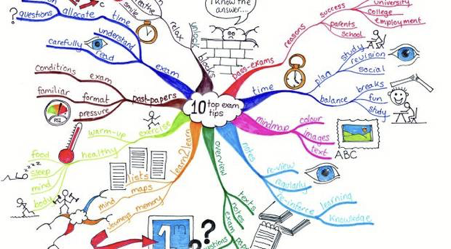
What are Mind Maps?
A Mind Map is a diagram in which information is represented visually, usually with a central idea placed in the middle and associated ideas arranged around it.
The steps to making a Mind Map
1. Create a central idea
The central idea is the starting point of your Mind Map and represents the topic you are going to explore.
Your central idea should be in the centre of your page and should include an image that represents the Mind Map’s topic. This draws attention and triggers associations, as our brains respond better to visual stimuli.
Taking the time to personalise your central idea, whether it’s hand drawn or on the computer, will strengthen the connection you have with the content in your Mind Map.
2. Add branches to your map
The next step is to add branches. The main branches which flow from the central image are the key themes. You can explore each theme or main branch in greater depth by adding smaller branches.
The beauty of the Mind Map is that you can continually add new branches and you’re not restricted to just a few options. Remember, the structure of your Mind Map will come naturally as you add more ideas and your brain freely draws new associations from the different concepts.
3. Add keywords
When you add a branch to your Mind Map, you will need to include a key idea. An important principle of Mind Mapping is using one word per branch. Keeping to one word sparks off a greater number of associations compared to using multiple words or phrases.
4. Colour code your branches
Colour coding links the visual with the logical and helps your brain to create mental shortcuts. The code allows you to categorise, highlight, analyse information and identify more connections which would not have previously been discovered.
Colours also make images more appealing and engaging compared to plain images.
5. Include images
Images have the power to convey much more information than a word, sentence or even an essay. They are processed instantly by the brain and act as visual stimuli to recall information